
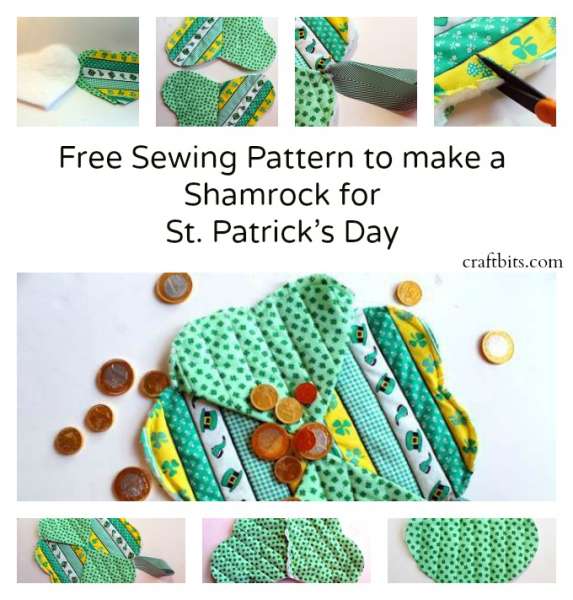
What you need
2 green fabrics (1/2 yard each), Batting, Sewing Machine, Green Thread, Green Ribbon
Instructions
1. Cut out 8 9″ wide heart shapes from your green fabrics. I did 4 of each fabric. Cut out 4 9″ wide hearts from your batting.
.JPG)
2. Pair up 2 of each fabric with one layer of batting in between them and pin them together. Stitch lines down them, quilting them by going through both layers of fabric and the batting. If you need to, you can trace the lines first with a pencil and ruler if you want the lines perfectly straight.
Repeat with the other 2 heart stacks.
.JPG)
3. Pair up 2 hearts, right sides together and stitch down one side, like the picture below.
Repeat with the other 2 quilted hearts.
.JPG)
4. Iron open.
.JPG)
5. Pin the 2 pieces right sides together and stitch along the bottom edge.
.JPG)
6. Iron open. Stitch around the outside edge of the shamrock, with a 1/4″ seam allowance.
.JPG)
.JPG)
7. Use a small pair of scissors to snip the edges so that they will fray a bit and stand up.
.JPG)
8. Cut a 10″ piece of green ribbon, loop the ribbon and place the ends underneath the edge of the shamrock. Stitch it down.
.JPG)
.JPG)
And you’re done! Happy St. Patrick’s Day!


Great idea and so easy. Thanks!
You could also use different colors and prints and use only two of the four “petals” to make cloth butterflies!!