
What you need
2 – Clay Plant Pots – Pot 1 should be 3 inches tall, Pot 2 should be 2 and 1/2 inches tall.
4 – Fake Flowers – 2 sets of peach rose fabric petals (3-7 petals each), 2 sets of pink tiger lily fabric petals.
2 – Fake leaves – 2 sets of green fabric leaves.
2 – Mini fake rose on stems – 1/2
2 – Mini fake flowers – about 1/4inch big.
1 – Tiny flower/bead – about 1/8 inch big.
1 – Styrofoam Ball – 2 inches around.
Paint – forest green and sage green
Paintbrush
Scissors
Glue
Toothpick
Instructions
Before we even begin the instructions, the materials need a small note. These material might be a little confusing, since you sort of “make your own” for this project. Here is more information about what you need to use.
Obviously the colors can all be change to suit the creators taste, as can the type of flower. One of the best things about this craft is that it’s great for using up fake flowers from a garage sale. It looks fancy, but should cost you less than a dollar to make if you?re a thrifty shopper!
Clay Pots
For the clay pots, one pot needs to be around 3 inches tall and 2 inches wide for the base. The second pot can be any size, just so long as it is slightly smaller than the first pot, and sits securely on top of it. These will become the body of our flower doll.
Fake Flowers
The fake rose and tiger lily need to be normal flower size. Make sure you will be able to remove the petals from the stem. If there are any plastic spines or middles attached, make sure these can also be removed. You only want the fabric petals of the flowers. These flowers will become our clothes and hat for our flower doll.
Fake Leaves
One set only needs two leaves, the other should have three. Make sure they can be removed from the stem. This will become our dolls arms and hair. You don’t want any plastic on these either, just plain, cheap fabric leaves, probably from your rose or tiger lily.
Mini Roses
You need the small, dusty pink ribbon roses, 1/2 inch wide, with the thin, 3-inch long wire stem. These will become our rose arms for our flower doll.
Mini-Fake Flowers
These need fake flowers to be tiny, small, and little! They need to be simple and removed from the stem. These will become our little floral eyes for this flower doll. If they have a small dot as a center, all the better for use as eyes.
Tiny Flower/Bead
You need an itty-bitty pink dot to create the mouth for the flower doll, just barely big enough to see. You can use a tiny flower, a tiny bead, or use one of the round plastic pieces from a flower middle. I picked a little fuzzy flower that was the same color as the dolls eyes. You’ll be using it to create a small, pouty, pink lipstick mouth.
Instructions:
1. Paint your clay pots and ball.
Turn the pots upside down, so that the narrow bottoms are facing up. Paint your pots forest green and your styrofoam ball sage green, as shown in the Step 1 picture. You can use spray-paint for the pots, but you need to use Styrofoam safe craft paint for the ball. Let dry.

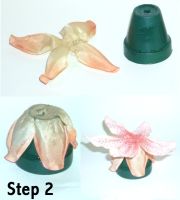
2. Glue flowers onto pots.
Take apart your fake rose, or two fake roses, so there are at least two sets of petals. One set of petals for each clay pot. Make sure the hole in the flower petals is big enough to slip the rose arms into.
Line up the flower petal hole with the hole in the bottom of the clay pot. Using a light amount of glue, paste the petals over the top of the pot. Add a little glue to the pots side, so that the petals will face down. Press the petals into the glue, so that they sit smoothly over the pots, as shown in the Step 2 picture.
Take apart the tiger lily flower and use one set of the flower petals on the larger, bottom pot. Line it up and glue it on just as you did the rose petals. Let the petals dry.
3. Make arms.
Take your two, small, ribbon roses. Each one will become an arm. Find two fabric leaves around two inches long. They need to be separate, so cut them into two pieces if they’re connected.
Lightly cover one side of the leaf with glue, and then place the rose wire in the middle of the leaf. Fold the leaf over the wire evenly, with the skinny leaf tip positioned just below the small rose, as shown in the Step 3 picture. This is one arm with a rose for a hand. Repeat process with other rose and leaf. Let dry.

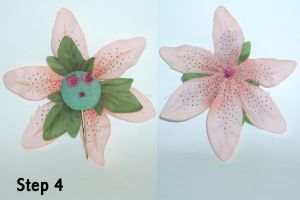
4. Make the head.
Stick a toothpick in the bottom of the Styrofoam ball for easy handling and gluing. Take your two tiny flowers and press or glue them onto your painted Styrofoam ball as eyes, as shown in the Step 4 picture. Take the tiny flower/bead and glue it on the ball as the mouth.
Take your fabric leaves and line them up at the back of the Styrofoam ball as hair. Take your remaining tiger lily petals and lay them over the leaves as a hat. You can use another tiny flower to secure the hair and hat in place, or just glue them. Let dry.
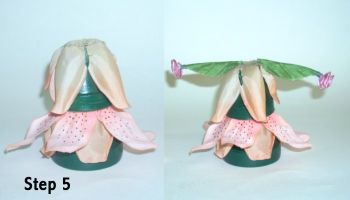
5. Glue the body together.
Place the large pot as the base, and securely glue the smaller pot ontop, as shown in the Step 5 picture. Slide the arms into the hole in the top of the pot. Do not glue them yet. You need to figure out how long you want them to hang.
Slide the toothpick into the top pot, between the arms. Slide it down until the head is sitting on the top pot. Judge your arms and fix if needed. Drip some hot glue into the hole with the arms to secure, and let dry.
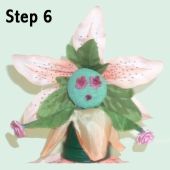
6. Glue head on.
Slip your toothpick between the two rose arms. Check how deep the toothpick sinks, because you want the head sitting right on top of the arms. Once you have the position figured out, drizzle some hot glue onto the toothpick and bottom of the head. Slip toothpick into hole and secure head on top of arms. Let dry.
Finish the doll by posing the arms, straightening up the flowers, and maybe even adding a basket for her to hold. Once the doll is dry and in the right position, it’s ready to be displayed or given away!
Notes:
These make adorable table centerpieces, especially when you put two or three around a bouquet of flowers in the center of the table. Last, but not least, they look perfect when set in the middle of a basket or bowl of potpourri. Just place the doll in the potpourri, push it in a little to make it secure, and you have a flower doll standing in a flower field!


What do you think of this project? Let us know!