
What you need
Clay pot – 4 inches tall, 4 inches wide at mouth.
Wooden beads – 2 – One, round red bead, 2 inches big. One, round yellow bead, 1 and 1/2inches big.
Chenille stems – 6 – 16-18 inches long, two yellow, two white, one red, and one blue.
Flower buttons – 3 – 1 inch big, two yellow, one orange.
Googly eyes – 2 – 1/2 inch big.
Yellow yarn – about 3 feet.
Hot glue gun/glue stick
Craft glue
Scissors
Red paint
Paintbrush
Instructions
1. Paint your clay pot a cheerful red as shown in the “Step 1” picture. Apply two coats if needed, and let dry. If your beads are not red and yellow, now would be the time to paint them!
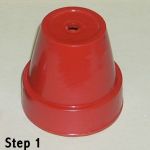
Clay Pot Step 1
2. Wrap your chenille stems around the base of your clay pot. Curl the stems and measure how long they need to be. Cut the stems to the needed length. Using a hot glue gun, slowly glue the stems around the base of the pot as the decorated hem of a skirt, as shown in the “Step 2” picture. Place the stems yellow, red, blue, yellow, and white.
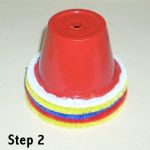
Clay Pot Step 2
3. Glue googly eyes onto the yellow ball in the proper eyespots. Gather your yarn and cut it into about 15 even pieces, depending on how long you want the hair. Wrap the hair around a pinky finger, keeping it even.
Use a chenille stem, ribbon, or string and slip the orange flower button to the middle. Use the button and ribbons to tie the hair together in a ponytail around your finger, so a small loop is left, as shown in the “Step 3” picture.
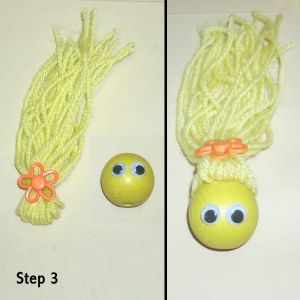
Clay Pot Step 3
Use a hot glue gun and glue the loop of yarn onto the yellow ball in the hair area. This should look like a ponytail, as shown in the “Step 3” picture. Let dry.
4. Cut the white chenille stem in half. Take one of the stem halves and slide a yellow flower button to the middle. Bend the stem evenly, and then twist the two stem pieces together, as shown in the “Step 4” picture.
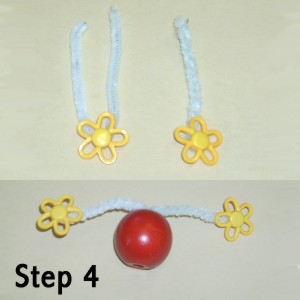
Clay Pot Step 4
Repeat process with second chenille stem half and button. Place the ends of the stems into the top of red bead, as shown in the “Step 4” picture. Add a little craft glue to secure the “arms”, and let dry.
5. Use a hot glue gun and glue the red ball to the bottom of the yellow ball as shown in the “Step 5” picture. Let dry. Use the hot glue again and securely glue the red ball to the clay pot, as shown in the “Step 5” picture. You can stick a toothpick or wooden dowel in the bead and clay pot to help secure them together. Let dry.
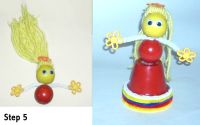
Clay Pot Step 5
You can stop the doll here and call her finished. However, I wanted to add a belt. I think it looks pretty, but more importantly, it helps strengthen that ball-pot connection. Just take a scrap of blue chenille stem and tie it around the waist. The doll is done!
Notes
Older children enjoy making these dolls themselves. However, because you need to use a hot glue gun frequently, the craft should always be done under adult supervision. Younger children will get frustrated, or hurt, trying to use the hot glue.
Forget about trying to use regular glue instead of hot glue for the chenille stems on the clay pot. The stems absolutely will not work with regular glue, you have to use the hot, super sticky glue to get the to stay put!
If you have a very young daughter, these can turn into a great game for a flower themed birthday party or spring carnival. Just make three of these dolls exactly alike. Hide a chocolate candy under one of the pots, and do the old quick “switcheroo” bit.
Ask the child to tell you what pot the chocolate is under. If they guess right, they get the treat! When they become bored of your doing it, let each child take a turn be the “dealer” and another child take a turn being the “player.”
If you do plan to use the dolls for the carnival game, make sure the hair, head, body, pot and everything it very well glued, very strong, and very well connected. To play that game you?ll need to go fast, and the easiest way to go fast is to move the dolls by grabbing the head and sliding the doll around the table.


What a cute and different way to use clay pots to make this little doll.