
What you need
Cardstock
Chalks
Make up applicator
Instructions
I have included 2 patterns, a small and a large leaf. You can either print them out, then cut them cut and trace the pattern onto what ever color or pattern paper you like. Or you can just put the paper you want to use in the printer. If using a print paper, make sure you have the paper so the pattern will print out on the BACK SIDE of the paper so the outline doesn’t so on the patterned side. If using solid, either way, no problem.
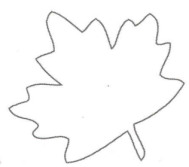
Chalk Scrapbook Leaf Pattern Small
Print/trace the leaves then cut them out. You now have a “die cut”. Take the die cut of the leaf and crinkle them up in your hands. Cardstock it pretty thick, so you might have to scrunch pretty good. Use your own judgment. You want to get some good wrinkles in the leaf die cut.
Now get out your chalks! You can also use ink for this process, but I never had much luck using ink, so I stuck with chalks. But if you are good with ink, you can try that too. For an applicator, I have found make-up sponges to be the best. Q-tips are the next of my preference or a cotton ball. If you have a way you like to apply chalks, use it!
To get a mix of colors to emphasize the fall colors, start with a light color chalk- like a yellow, then a medium green. Then work a brownish/red in , and then work a dark brown last. You’ll use these colors by adding another color on top of them with each layer. Use more of the lighter colors and less of the darker colors – if you use to much dark, you will cover the lighter colors. Remember, you can always add more, but if you get to much, you can’t take it away.
Using the sponge and yellow chalk, rub it from side to side over the wrinkles. Then more you rub and the harder you press, the more yellow chalk will get onto the wrinkles and into the creases. How much you rub, determines how much yellow get on the leaf. You are aiming for the color to get on the wrinkles the heaviest and then gradually filter out to the rest of the leaf.
You might have to work a few until you get the technique the way you want it. But it is pretty easy. Lines don’t have to be straight and exact and colors don’t have to be specific and stream-line so you have alot of “play room”. You can make them as dark or as light as you want. You can give alot of color, or just one or two colors.
Once you have the leaves the way you want them, place the chalked die cut face down on a piece of white scrap paper and smooth out the wrinkles a little bit, not much, just to smooth it out a bit and blend the colors a bit more. Now, turn it over and your leaf is ready to embellish your Thanksgiving Day layout! If you have a fall theme, pumpkin patch theme – it works great for that too!
And you can also use these leaves in your interior decorating – make alot of them – (the kids will love doing this!) and use them to decorate the walls, the table center piece – even use them as name place cards! Just get a black marker pen and write names on the leaf and place it on the plate so people can see where they are suppose to sit! Works great!
Note: These patterns are not my own creation. I don’t remember where I got them, but they have been in my pattern file for about 8 years now! I just thought I’d share them with you all!


Thanks for the great idea and pattern!
LLMcD
sorry, sorry, I obviously wasnt paying attention…I got it 😛
cool pattern I must say but where’s the link so I can print it?? cool though 🙂