
What you need
Altoids tin (or any other rectangular hinged tin measuring 3.9″ x 2.5″)
2 pieces of 8 1/2″x 11″ Cardstock Paper in the color of your choice
Roll of Sticky Strip ( 1/4″ width) or any other double sided adhesive that will work well with tin
Ribbon: 1 yard of 1/4″ wide grosgrain stitch ribbon
1/2 yard of 1/2″ wide ribbon
(Note: Based on these measurements, you should have extra ribbon in case of error or if you want to use additional ribbon to embellish tin. It is always better to have more, than less!)
Stamps or stickers of your choice (Stampin’ Up stamps were used for this sample)
2-3 Stamp pads in the colors of your choice
Tools Needed
Small Corner Rounder
Paper Cutter
Ruler
Scissor (sharp)
Instructions
1. Empty contents of Altoids tin. Wipe out residue; if cleaning with water, make sure your tin is dried thoroughly before proceeding.
2. Take cardstock and cut out four pieces: two pieces measuring 2 5/16″ x 3 11/16″ (for top and bottom cover of tin) and two additional pieces measuring 2 1/8″ x 3 1/2 “(for inside of tin)
3. Use your corner rounder to trim all four corners on each of the four pieces. Tip: You can ink the edges of the paper to give it a more distressed look.
4. Decorate all pieces of paper using your stamps. Use more than one color ink and a variety of stamp sizes to create the perfect look. Tip: Start stamping in the center of your piece and work your way out. Stickers are an alternative way of decorating your paper. Set aside the two smaller pieces allotted for the inside of the tin.
5. Determine where the top of your tin is. With your tin placed in front of you, the bottom hinges should be closest to you. The metal seam where you would open the tin should be directly above. Situated this way, your tin should now open towards you. It is very important to keep this in mind when proceeding with the following steps.
6. Once dry, carefully adhere one piece of paper onto the front of your tin and the other to the back using the Sticky Strip adhesive. Keep in mind, Sticky Strip creates a strong bond, almost immediately. Line your paper up carefully with the corners. Make sure your corners are evenly covered with Sticky Strip .
7. Next, line the outside upper edge of the tin with Sticky Strip (narrow trim above metal seam where you open the tin). Sticky Strip should evenly wrap around the entire tin. Note: You may need to cut smaller pieces for the area above the two hinges located on the bottom of your tin.
8. Once Sticky Strip is secured on the tin, take your 1/4 ” wide ribbon and firmly adhere the ribbon to the upper edge of the tin. Note: Always start at the center of the back of the tin and work your way completely around.
9. Repeat steps 5 – 7 for the outside lower edge of the tin (wide trim underneath metal seam where you open the tin). Work from the bottom of the tin up. Sticky Strip should evenly wrap around the entire tin once. Then wrap a second strip around the tin, directly above your first strip (creating a 1/2″ wide strip). You will firmly adhere the 1/2 “wide ribbon in this area. When you open the cover of your tin, you will find a 1/4″ wide area of exposed tin above your 1/2 ” ribbon. This is necessary in order to properly open and close the tin.
10. Cut out two 8″ pieces of your Grosgrain Stitch ribbon. This will be used to create the handles of your tin purse.
11. On the top cover of your tin, adhere two pieces of Sticky Strip vertically (approx. 3 1/4 ” each). One strip should be3/4 “inch in from the right and the other should be3/4 “from the left. Remember that your tin should be situated top up, with the bottom hinges closest to you.
12. Starting at the bottom of your left Sticky Strip piece and going upwards, firmly adhere ribbon. Allow for a small loop for the handle and then continue to adhere the ribbon to the right Sticky Strip piece starting at the top and going downwards. Trim off any excess. Repeat step for the back on the tin.
13. Line the backs of the two remaining pieces of paper with Sticky Strip . Adhere these pieces of paper on the inside of your tin. Tip: You can feel free to use ribbon remnants as a decorative element on these pieces. If doing so, make sure to glue them down prior to gluing paper on inside of tin.
14. Enjoy your adorable creation! Happy crafting!
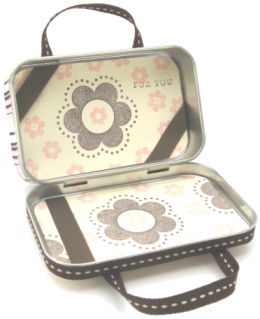
Altered Tin Mini Purse Open
An original design by: Jennifer Camacho


Hi there, I featured this post on my Unique Gift Wrapping round-up. Come Check it out! http://www.craftyallieblog.com/2014/12/12-days-of-christmas-day-7-unique-gift.html
Another idea would be to use the small stick match boxes.
Nice! Now I know what to do with my tin stock. Thanks
this a very usefull tool i like it !
I found a craft like this in a magazin! I LUV IT! I use it for money or whatever ! :D:D:D:D
What I would do is put a longer string on it so you could actually use it for a purse, that way you could wear it with a dress or something.
This is amazing. 😉
Would it work if I covered it in denim? Just curious. 🙂
cool idea! this is just the right size to hold my mp3 player!
I did this a few years back and used them to put party favor in for my birthday party.
How cute. I love it
small but beautimuss
What a clever idea!!
I think I will give this a try. Except I think I will use fabric and photos and make a brag book to attach to my diaper bag.
It is so cute! I love it! I could put all my stuff in it!
Thank you for this tutorial. This was my first try and now I’m pretty sure I’m hooked 🙂
This site has every great idea wrapped in one!! luv it but 4 someone with less time on their hands it looks like i wil hav 2 pass, also u need good quality material, but its brill
I didnt have the right glue thing so mine didnt turn out great. it would have if i used the right glue!!!
Cute! This would be a cute ipod case. My ipod would fit perfectly in there!
finally!! someone else who finds these type of tins too cute to throw out!
i love it..and the materials are easy to find…
COOL
Love this craft. I’m curious though where you get 1/2″ ribbon, all I can find is 5/8″ and I’ve been to 3 stores including a ribbon outlet.
Now this is something that everyone can do!
Swwweeeeeeeeeeeetttttt!
This is adorable and different.
very cute!! and great idea, simple directions to follow
Very cute.
this is sooo cute. i love doing things with those mint tins.
great idea!
i luv it!! u did it so well! the cuts were perfect! thx 4 the pictures
i luv it!! u did it so well! the cuts were perfect! thx 4 the pictures
so cute!! love it
This looks so cute and easy! Thanks for the detailed steps!
This is very cute. What a great idea. Thanks for sharing
great project idea! hope to see some more re-used, recycled things soon!!!
Very clever craft!Easy to follow directions & finished project is adorable-can’t wait to try it!
This is so cute! Can’t wait to make my own.